An ounce of preparation = (several) pounds of home-cooked food.
At the end of a busy day, preparing a nutritious home-cooked meal can be difficult and time consuming, especially when there are kids to chase around. Personally, I find that the food preparation portion of meal planning (and the copious dishes that come with it) to be the biggest hurdle to surmount, both in terms of time and energy.
Making healthy meals can be particularly tricky when entering into a busy or stressful period of time – such as welcoming home a new baby, a crazy school and work schedule, when your house is undergoing renovations, or when you unexpectedly find yourself dealing with any of those things, plus a global pandemic.
Condensing food preparation
The solution I’ve found works best is doing a large chunk of food preparation in one sitting. Every three to four weeks I take a window of time, usually around three hours, and just prepare several large-scale meals. I assemble all or most of the ingredients, put them in freezer bags with labels and instructions, and put them in the chest freezer.
This system works particularly well for meals cooked in a slow cooker or crockpot. A slow cooker in general is pretty much a must-have tool for busy families. There is no beating the ease of dumping in ingredients, setting the cook time, and walking away until it’s ready!
If you are a meat eater (which I am not) there are even dozens of three to four ingredient slow cooker meals that are exceedingly easy and quick to prep. To the vegetarians and vegans out there, worry not for there are plenty of options; they just generally require more than three ingredients.
This prep-ahead method of cooking also works well for stovetop and oven cooked dishes. You’ll see below that I do this for making quiche, which is partly cooked stove top and then baked. This type of cooking often has more than one step, but you can always separate out ingredients into containers that you will add at different times. Having all the food prepared in advanced is still a major time-saver, even if you aren’t just dumping it all in a slow cooker and turning it on.
This week I prepared five meals in one sitting and froze four of them for later. Check out the steps below, and see if this will help you save time and smooth out your kitchen’s craziness!
Planning your dishes
Take some time the morning of, or a day or two in advance, to decide what you are going to be cooking. Pick recipes that will provide a main dinner with many leftovers to be eaten over the week or frozen for future dinners and lunches.
Think of your favourite go-to meals or recipes. Those that require several veggies to be peeled, chopped, diced, or shredded, and ingredients that can easily be assembled ahead of time are great options. Add these dishes to your list.
You can also take a look online for recipes (slow-cooked or otherwise) for other ideas. It is helpful to start your search with a main ingredient in mind, such as black beans or sweet potatoes, and go from there. Consider looking at your local grocery store’s flyer to see what is on sale this week and make that a starting point for one or a couple of your recipes.
Next make a comprehensive grocery list, going over each recipe and taking note of what you already have in your cupboards. I recommend double-checking it to make sure you have everything you’ll need for the coming “marathon” of food prep.
Now get thee (or someone in your household) to a grocery store, either the same day or within a day or two before you will be doing your prep. Since a lot of my meals have perishable veggies (and my partner tends to eat food I already have plans for) I like to keep my grocery trip and my food prep session close together.

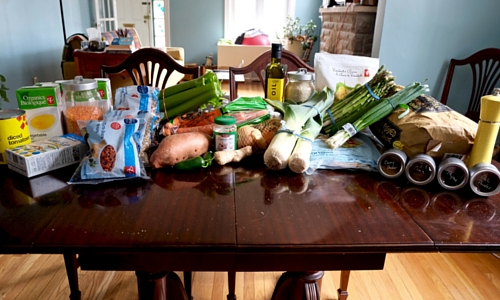
Food for five large meals with plenty of leftovers for a family of three (plus or minus an ingredient here or there)
Here are the 5 (+1) recipes I made recently:
1 (+1). (Not) Refried Beans
I prepped this dish first and put in my slow cooker while I prepped the other recipes. Once it was finished a couple of hours later, I immediately made 12 Freezer Burritos with additional ingredients I had prepped with the rest of the recipes below.
3. Slow Cooker Lentil Shepherd’s Pie
4. Slow Cooker Sweet Potato and Lentil Soup
5. Veggie Quiche – this is a go-to “cooking-by-feel” dish for me. I just pick a couple veggies (asparagus, zucchini and carrot this time around) sauté with onion and garlic, add to a piecrust with an egg and milk mix, and bake. I don’t prep the egg mixture until I’m actually making the dish, but having the vegetables prepared ahead of time makes quiche lovely rather than tiresome to make.
Extra time-saving tips
- Nix the peeling – I personally don’t peel potatoes, carrots or many other veggies. I give them a good scrub with an abrasive washpad and chop them up. It saves time, and probably some nutrients as well. It’s up to you though because some veggies might need to be peeled.
- Check out the frozen veggie aisle – there many pre-cut and frozen options for vegetables in your recipes. I often do this for butternut squash because its awkward shape makes peeling a chore.
- Pre-minced garlic – I buy minced garlic in a jar because, like the butternut squash, I find peeling and mincing garlic very time consuming despite my great love of its taste.
- Pull out the food processor – If you have one, using a food processor is a quick way to dice, slice, or shred certain veggies. I use mine for all the onions my recipes call for because it takes mere seconds to dice several onions. I’ll also slice carrots and celery, and shred anything from cheese to sweet potato. I find the food processor particularly well suited to this type of meal prep because it’s a bit of a pain to wash. With this method though, you prep many meals and only have to wash once (save for a rinse or two if necessary between recipes), so the time-saving is worth the awkward cleaning.
Getting down to work
Prep one recipe at a time, unless more than one recipe calls for something that is easiest to prep all at once. Going ingredient by ingredient for each recipe separately helps keep the amounts for each dish straight.
On your grocery run, if you don’t already have them, pick up some extra large heavy-duty freezer bags. Large bags work, but extra large are much easier to pack up and allow for bigger meals. You can also use freezer safe plastic or glass containers, though I find the bags more flexible for storage.
Dice up your onions, chop your veggies, open your cans of diced tomatoes and salsa, and spoon out your spices. Add them all to the freezer bag and seal it up. Freezer bags can be a little awkward to add your ingredients too, so try the following tip.
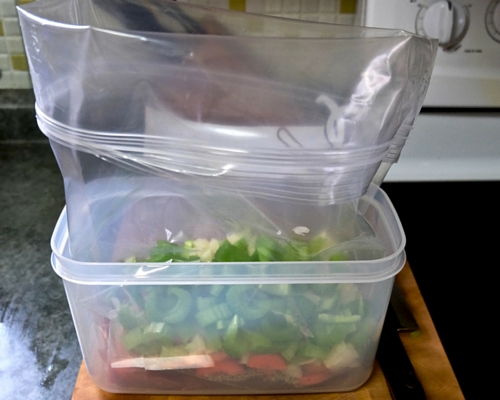
Place the bag in a rectangular container, either tall or short, and fold down the top of the bag (this helps keep it open and gives it a bit more structure.) See the photo below for how it looks. Even if your container is too short relative to the freezer bag, it still provides good support and structure, even when filling above the hard container.

A rectangular container helps to give the freezer bag structure and keep it open while adding ingredients.
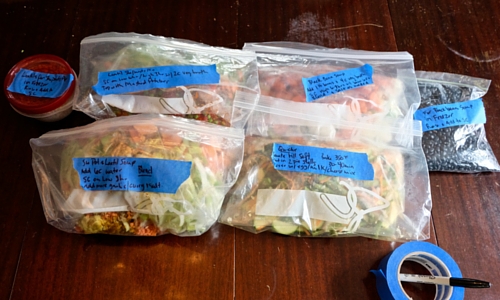
Label each of your bags with the name of the dish and any special instructions. For example, note how many cups of vegetable stock are to be added, or additional ingredients not included in the freezer bag (such as rice or dried beans that need to be rinsed and added.) Note the temperature, method and length of cooking, and any steps to follow while or after cooking.
I use masking or painter’s tape (we’re renovating, so it’s the most readily available tape we have) and a sharpie to write out instructions in as much detail as I need on the tape. You can also write directly on the bag, but if you are hoping to reuse the bags, then tape is better because you can just peel it off. Use shorthand where possible, such as SC for slow cooker.
Remember, if there are multiple steps to your dish, you can put differently timed parts in different containers. You can also do this when dishes call for dried/canned beans, lentils, rice, pasta, or other items that don’t need to be frozen to keep. Take the time while already engaged in food prep to measure out and pick over (if necessary) and put them in a separate bag (with its own label and instructions). Keep these parts in a specific cupboard you can designate for prepped freezer recipes. If there are canned or packaged ingredients you didn’t put in the freezer bag, stick a label on it also so you don’t forget it already has a purpose (and so nobody else will eat it!).

Lots of food ready to go when we need it – minus the vegetable stock and mashed potatoes (for the lentil shepherds pie).
Cooking the meal
Pull out your bag (or bags) from the freezer the day before you plan to make it, and let it thaw in the fridge. Follow the instructions for the recipe you noted on the label and make your awesome home-cooked meal without the food prep!
To give an example, when I make my pre-prepped quiche, I sauté the veggies from my freezer bag while I stir up an egg and milk mixture with some cheese and herbs. Once the veggies are soft, I spoon them into my prepared pie shells and then pour the egg mix over top and pop them in the oven. The two quiches last in the fridge for several days and provide many yummy meals.
What I love about this method is that it divorces the work and cleaning of food prep from the generally easier and less time-consuming task of cooking (especially if it’s in a slow cooker!) When you combine food prep for several recipes in one sitting, it makes it more efficient and often less wasteful.
Ingredients shared across recipes can be bought, washed, and prepped at the same time, and rather than washing your food prep utensils and tools for every meal, you just do it once at the end after preparing several.
Good luck and happy eating!
Jen Vander Vecht is a writer and soon to be full-time mom. When not crafting four different knitting projects at once, she can be found dumping ingredients into her slow-cooker, walking the dog, watching Doctor Who, or researching cloth diapers.


