The pumpkins are carved, the kids’ costumes are complete and all is ready to go (and if not, we’ve got lots of Halloween inspiration).
What else is there to do before Wednesday? How about some sweet treats? While these may look scary, these sinister sweets are simply scrumptious. Your wee ghouls will gobble them up (and admit it, you will too). The Eyeball Cookies are haunting but delicious; the Mummified Cupcakes make the perfect Halloween-Eve dessert and the Meringue Bones may look frightful, but they are bone-bitingly good.

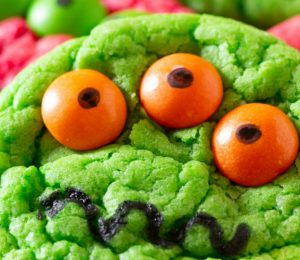
Eyeball cookies
You might have made thumbprint cookies before – little discs of dough with a thumbprint indent filled with jam or similar – but have you ever made them like this?! If you prefer, you can buy ready-made sugar eyes from sugarcraft suppliers.
6 1/2 tablespoons butter, soft
3 tablespoons crunchy peanut butter
1/2 cup sugar
1 egg yolk
1 teaspoon pure vanilla extract
1 cup plus 2 tablespoons all-purpose flour
a pinch of salt
to decorate
2 oz. white ready-to-roll royal icing
blue, green and red food colouring pastes
10 oz. white chocolate, chopped
24 brown candy-coated chocolate drops
baking sheet, lined with nonstick baking parchment
Makes about 24
1. Preheat the oven to 180°C (350°F) Gas 4.
2. Put the butter, peanut butter and sugar in a mixing bowl and cream until pale and light – 3–4 minutes. Add the egg yolk and vanilla extract and mix until combined.
3. Tip the flour and salt into the bowl and mix again until smooth.
4. Pull off walnut-sized pieces of dough and roll into balls between your hands. Arrange on the prepared baking sheet. Press your finger into the top of each cookie to make an indent. Bake the cookies on the middle shelf of the preheated oven for about 12 minutes until golden and firm. Allow to cool on the baking sheet for 2–3 minutes before transferring to a wire rack until cold.
5. To decorate, divide the royal icing in half. Tint one portion bright blue by dipping a toothpick into the colouring and applying it to the royal icing. Knead it in until the icing is brightly and evenly coloured. Repeat with the other icing using the green colouring paste. Divide the blue icing into 12 equal portions, roll into balls and flatten into discs. Repeat with the green icing. Cover them all with plastic wrap and set aside.
6. Melt the white chocolate in a heatproof bowl either in the microwave on a low setting or over a pan of barely simmering water. Do not let the base of the bowl touch the water. Stir until smooth, then allow to cool and thicken slightly.
7. Taking one cookie at a time, dip the top into the melted chocolate and place on a wire rack. Position either a blue or green icing disc in the dent in the middle of the cookie. Dip one side of a chocolate drop in the melted chocolate, then position on the icing disc.
8. Dip a toothpick into the red food colouring paste and wiggle red, veiny lines across the white chocolate. Allow to set before serving.

Mummified cupcakes
Look for edible sugar eyes from online sugarcraft suppliers but if you can’t find them you could just as easily use coloured candy-coated chocolate drops or even pipe little black eyes using black writing icing.
24 edible sugar eyes
vanilla cake
15 tablespoons butter, soft
1 cup plus 2 tablespoons sugar
4 eggs, lightly beaten
1 teaspoon pure vanilla extract1 3/4 cups self-raising flour
2 tablespoons milk
meringue buttercream
1 cup superfine sugar
3 egg whites
2 sticks butter, soft and diced
1 teaspoon pure vanilla extract
12-hole muffin pan, lined with white paper cases
sugar thermometer
piping bag, fitted with a 3/8-inch flat-sided tip
Makes 12
1. Preheat the oven to 180°C (350°F) Gas 4.
2. Put the butter and sugar in a mixing bowl and cream until pale and light – about 3–4 minutes. Gradually add the eggs and vanilla extract, mixing well between each addition and scraping down the sides of the bowl with a rubber spatula from time to time.
3. Sift the flour into the cake mixture and mix until thoroughly combined. Add the milk and mix until smooth.
4. Divide the mixture between the paper cases and bake on the middle shelf of the preheated oven for about 20–25 minutes or until golden, well risen and a skewer inserted into the middle of the cakes comes out clean. Allow to cool in the muffin pan for 3 minutes before transferring to a wire rack until cold.
5. To make the meringue buttercream, put the sugar and egg whites in a heatproof bowl set over a pan of simmering water. Whisk slowly with a balloon whisk until the sugar has dissolved, the mixture starts to thicken and turn white and it reaches 60°C/140°F on a sugar thermometer – about 4 minutes. Remove from the heat and whisk with an electric whisk on medium speed for another 3 minutes or until cold, very thick and glossy white. Gradually add the diced butter, beating constantly until the butter has been incorporated and the frosting is smooth. Fold in the vanilla extract.
6. Immediately spoon the frosting into the piping bag and pipe bands across the cupcakes from side to side, allowing some bands to overlap slightly. Press 2 sugar eyes into the frosting on each mummified cupcake.

Meringue bones
Surprisingly realistic but very easy to make, these bones can be made 1–2 days before your Halloween party and stored in an airtight box. Have fun making them in different shapes and sizes and giving them away to trick or treaters – that’ll scare them!
1 cup superfine sugar
31/2 oz. egg whites (from 3–4 eggs)
a pinch of salt
piping bag, fitted with a plain 3/8-inch tip
2 solid baking sheets, lined with baking parchment
Makes about 20
1. Preheat the oven to 200°C (400°F) Gas 6.
2. Tip the sugar into a small roasting tray and heat on the middle shelf of the preheated oven for about 4 minutes or until hot to the touch.
3. When the sugar is hot enough, remove from the oven and turn the oven temperature down to 110°C (225°F) Gas 1/4.
4. Put the egg whites and salt in a bowl and whisk with an electric whisk until foamy. Quickly tip all the hot sugar into the bowl and whisk on medium-high speed for about 6 minutes until the meringue is very thick, super glossy and white.
5. Spoon the meringue into the piping bag. Pipe log shapes, each about 4 inches long on the baking sheets, spacing them well apart. Pipe 2 balls of meringue at each end of the logs to make a bone shape.
6. Bake on the middle shelf of the oven for about 40 minutes or until crisp. Turn the oven off and leave the bones to cool inside.
Recipes and images from Halloween Treats by Annie Rigg is published by Ryland Peters & Small, and distributed by Thomas Allen & Son in Canada. Copyright © 2012. Excerpted by permission of the publisher. All rights reserved. No part of this excerpt may be reproduced or reprinted without permission from the publisher.